Tutorial-3 ways to quilt pearls
I’ve had several requests for a tutorial on how to quilt strings of pearls. This is a beautiful and useful motif to add to your bag of tricks. Pearls are probably not for the beginner, but it’s not a difficult motif either. Here’s how I’ve used pearls in some of my work:

I love pearls as a divider-I do this a lot.

How about to fill a border?

Or to fill a feather’s spine?
Before you even start, make some mindful choices:
-Thread-I usually use a low contrast thread for pearls-their real beauty is in their puff, not the stitching itself. A shouting thread can actually detract from their beauty. I tend to use a skinny thread too-from a 50 weight 2-ply all the way to a 100 wt silk.
-Size-It’s a bit tricky to do larger pearls and have them end up all nice and fat. The optimum size is around 3/8 – 1/2 inch. Once you have some experience, bigger pearls will come easily.
-Batting-A fluffy batting always makes pearls look better. That may not be the best choice overall for your project, but if pearls are a highlight, consider a fluffy batting.
-Fabric-Pearls need a tightly woven quality fabric to look their best. A low thread count fabric will cause your pearls to look pixelated. If you use a fabric with sheen like a sateen or a silk blend, oh my, they are divine!
I am showing three ways to do pearls. I do this because everyone’s brain works differently. I prefer Method 3, but another method might work better for you. Here we go:
METHOD 1-“LONG ARMER PEARLS”
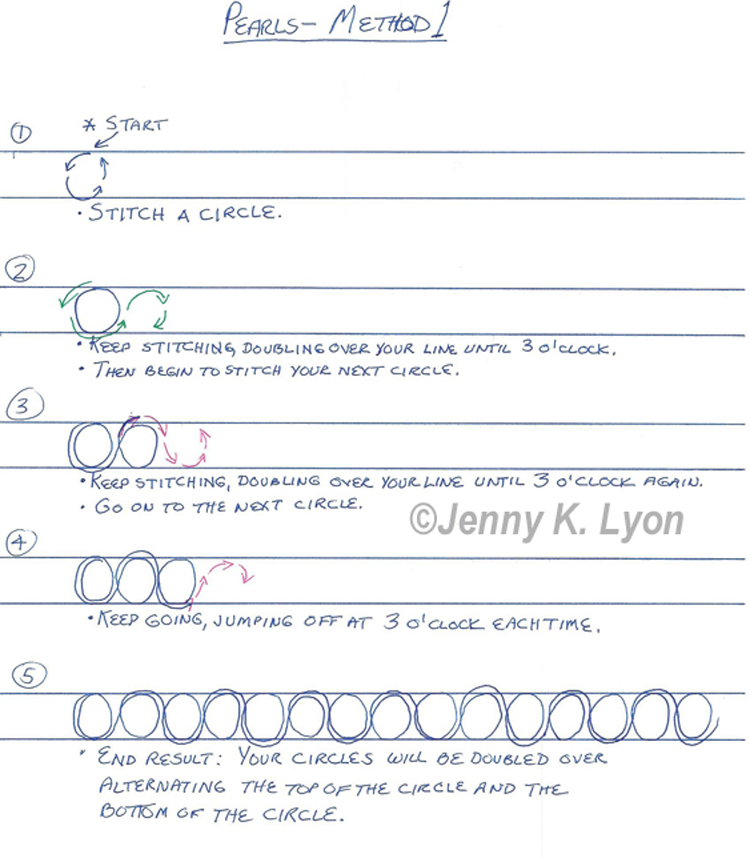
I call these long armer pearls because I notice that professional long arm quilters tend to quilt pearls this way. I think it works well for the way their machines “drive”. It does produce pearls that are double stitched on only half of the pearl as you’ll see below.

I’ve marked my lines and stitched along each one in preparation. Now I’ve stitched my first circle counter and I’m back at the place I started. Makes no difference if you quilt it clockwise or counter-do whatever your brain thinks is easiest.

I’ll continue stitching until I reach 3 o’clock and then I’ll head off into my second circle.

Beginning the second circle….

Finishing that second circle up and heading for the third circle by jumping off at 3 o’clock again. Notice that the first circle is doubled up on the bottom part of the circle and the second circle is doubled up on the top part of the circle.

Done with that third circle, ready for more! I did deliberately not hit my line so that you could easily see the doubling up.

If I continue on this way, this is what I get. Very pretty. That doubled top and bottom alternating bugs me, but maybe not you!

Here’s a drawn summary of long armer pearls-this may work better for you or become your cheat sheet.
METHOD 2-SCALLOP METHOD
I learned the scallop method from Diane Gaudynski, my Quilting Hero. This is my least preferred method-it’s hard for me but might work beautifully for you. I end up with tilted eggs.

You prepare for this method by using a temporary marker to mark the middle of the row. Begin your quilting by creating half-circle scallops along the top portion of the row.

When you get to the end of your row, continue on by making scallops on the bottom.
IMPORTANT: When you are quilting this way, make sure you are always looking ahead of the needle. So, when my needle is at the bottom of the scallop, touching the line, my eye is looking ahead to the “point” of the upper scallop. If I’m looking there I am going to hit it. If I’m not, I’ll miss it and my lines won’t connect. When my needle is at that “point”, my eye is now looking ahead to hit that bottom line.
Keep looking ahead at the next “hit” point and you’ll do well on this one.

They’re pretty but my brain fries trying to do it this way.

My summary above for scalloped pearls…
METHOD 3-JENNY’S METHOD
Okay this is MY method so of course it makes the most sense to me. I do a complete circle, then travel forward along the line to the starting point of the next circle and so forth. It results in single stitched circles and double stitched lines, which satisfies my compulsiveness, grin!

Start off in the normal fashion and begin at the top, stitch a complete circle.

Travel along the top line (line will be double stitched) to the starting point of the second circle.

I have completed the second circle and I’m right where I need to be to begin the third circle.

Continue on until you complete your row. Note that now the top line is double stitched and the bottom line is single stitched.

I’m continuing on by stitching to the bottom of the circle and now will stitch over my bottom line.

Bottom line stitched. Done and pretty! Circles are stitched once, lines twice, life is good.

My summary above for Jenny’s pearls…

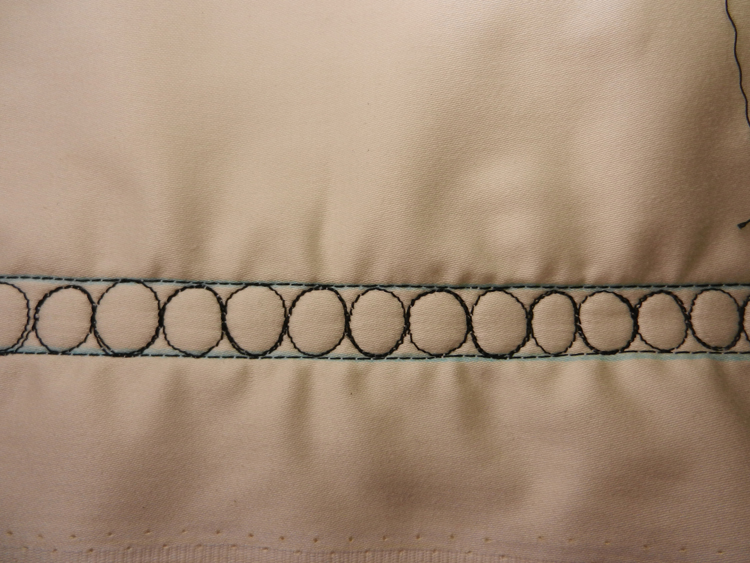
Just so you know, your pearls do not have to be perfect! Here I’ve used a low contrast thread and tortured some of the circles but I still think it looks pretty good.
If you want to add pearls to your work, I suggest you sketch each method to find the one that works best for you. I’d love to know what you think-which is best?
I’m linking up to Nina-Marie’s Off the Wall Friday here-check out all the fun links!
Who knew there were 3 ways to do this?! Thanks!!
That’s why there is chocolate AND vanilla!
What a great observation! Yes, same thing-and I like the ice cream analogy.
If I do pearls in between lines I use your or Diane Gaudynski’s method depending on my thread choice but for filling areas in different sizes neither works for me. I choose to do half figures of 8 (left half of top; bottom right half so it is like long S shapes) in long strings and then return back doing the other half. They are not necessarily as perfectly circular as the pearls are if you back-track but I prefer that to having thread building up on half or more of the circle. In order for them not to become straight rows I start off doing a curved row or echo the edge of an applique.
Thanks Maga. Oh dear, forgot about the serpentine method-I was REALLY bad at that one! Glad it works for you-goes to show that each of us work differently.
Don’t worry; we forget what we don’t use – I never knew it had a name but serpentine is of course perfect for describing this method.
Very interesting. I am always doing then the first way (there is no way I could do the 2nd method). I found the 3rd method interesting if you have a line you can follow. I’m usually doing pebbles as a filler, so i’m going in every directions, so sometimes it’s double stitched half the pebble, sometimes just a quarter…. I try to keep them of different size, it is really more easy for me. And as I like to say, don’t aim for perfection, aim for organic look.
I like to do my pebbles different sizes also-more interesting. I love the organic look too! Pebbles are different to me-I do them willy nilly but I see pearls as more structured and regular, hence the various ways to do them. Thank you for the comment Chantal!
my method is the same as your third example, except i don’t stitch a second line, just mark it. Result is single stitch pebble AND single stitch line.
Thanks for your comment Sheila. I didn’t realize it until you wrote: I do two lines because the travel line on top can get a bit wonky so the other line kind of straightens it. Bravo that you can make it look good with one pass!
I am not a longarmer, so between 2 and 3, I like 3 best. Have tried to make 2 work, as I love Diane’s work also. Will try #3. Have done something like that, but now will try filling in the bottom line. That looks great. Thanks for this.
Hi Nancy; Maybe Diane’s method will work great for you! It certainly is the easiest way if you can get circles from it (I get eggs). I’m glad you enjoyed the post.
Thank you for sharing three different ways to FMQ pearls. Can’t wait to give them a try.
You’re welcome Gwyned! Hope you enjoy them. Thanks for your comment.
Great tut!! I really need to start practicing some of these great methods!
Thanks Nina-Marie-they’re great fun!
Wow. You’ve put a lot of thought into this. Thanks for sharing and for linking up so I could find your blog. This is interesting info. I often quilt with pebbles, which I like a lot. I’ll have to try these methods for the pearls.
Thank you Teresa-yes, I actually did put a lot of thinking into this tut. I’m glad you enjoyed it and I think you’ll love pearls!
Great tutorial! Thanks for the info!
You are welcome Cheryl-glad you enjoyed it!
Great tutorial! I tend to do method 1 or 3.
Wow! This is really a great tutorial! It makes me think what I am actually doing and will help me to perfect my pearls. I do method 1, but I will try the others plus the serpentine to see if those methods improve my pearl skills. Thank you!
You’re welcome Kay! And what a giggle-“pearl skills”-who knew?
Great tutorial! I like your pearls of wisdom (sorry! I just couldn’t resist). I’m encouraged to use the design in my qilts now too. Thanks for the help on this.
Oh Franki-how could you? Glad you enjoyed it!
You’re the best. Beautiful work and you know how to teach what you do. That’s special. Thanks.
THank you for such kind words Pat!
Thanks! I needed that.
You’re welcome! glad you enjoyed it.
Thank you for showing the different ways to do circles. I’ve tried to do them before and didn’t like the result. This looks so much easier, and I can’t wait to try all 3 versions on my practice pieces to find out which one I like the best. Your instructions are great, and detailed to the point!
That is great to hear Carole-once you know how to do them and practice bit you’ll love putting them on your quilts!