It’s all about the puff
So, funny story: I took a 5 1/2 day class from Diane Gaudynski at Empty Spools/Assilomar. Right next to us was a group whose mission was to legalize marijuana. They were an odd bunch, no two ways about it. The men were wearing rumpled message t-shirts with phrases like “If the whole world smoked weed, peace would break out”. The women wore mounds of fabric on their bodies. And many did appear to be, um, compromised, and pretty happy.

They were a peaceable bunch and tended to take their breaks around the same time we did, which led to some very interesting juxtapositions. Envision the bespeckled, gray-haired quilter of a certain age awkwardly chatting with the stoners marijuana people. I wasn’t all that uncomfortable-I did go to college in the 70’s after all.
But then, at some point, we realized we did have something in common-it was all about the puff! Their puff was a wee bit different than ours, but it was indeed about the puff. Diane led us through a great mini-lecture about puff and free motion quilting.
Be mindful of the puff you create with your quilting. It is powerful and can make or break your look. The puff is what makes your quilting stand out; puff gives it dimension and elegance. Here’s what I mean:

See how the tiny micro-stippling around the feathers really make the feathers stand out? If I quilt very closely, I smash down the background and command it to be flat. Therefore any puff that flatness surrounds will become even more pronounced. Here’s a larger view of that same area:

I think you can see pretty clearly how the stipple compacts the batting and makes the feathers appear super puffy. Almost all of these photos are of samples that I used to experiment with different concepts. I’m also using my new phone for photos-not sure yet if I like them.
It may not be as obvious here, but what you’re looking at is my learning curve. The lower piece was made earlier. The lines are a wee bit close together and the beauty of the pattern is somewhat diminished. On the upper quilt (Poppies) I figured that out and did not quilt so densely. The texture on that piece is glorious and abundant.

This is a sample I’m working on to figure out a new whole cloth quilt I have in my mind. You can see lots of texture and puff between the quilting lines here-that’s what I want!

This photo and the one below are parts of bubbles samples I take to class. On this piece you can see how those large bubble really punch out-they are quilted less densely than the surrounding bubbles. If I want to highlight a shape, I can quilt less densely-up to a point.

Here you see the dimension of some large bubbles. The more densely quilted upper portion would be perfect against something less densely quilted that I wanted to highlight. And if I mico-stippled between the big bubbles they would really stand out!

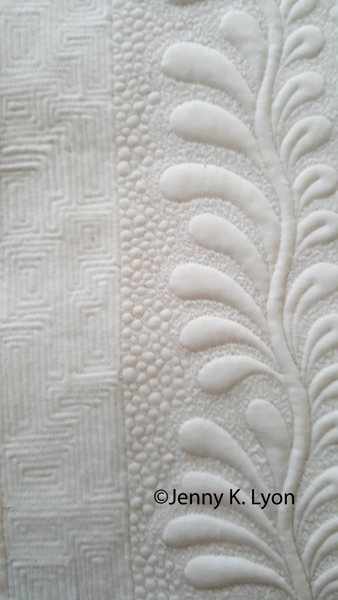
The very tight micro-stipple highlights the curvaceous nature of the feather beautifully. I deliberately did not quilt the right side so that you can see how much difference the micro stippling makes around the feather. You will be relieved to know that I micro-stippled using an LED magnifier lamp. Only very young eyes could do that without assistance.

I hope you can clearly see here how much difference the distance between lines makes. The left side’s lines are quilted closely enough that it flattens the area. The right side has lines about 3/8″ apart and I see voluptuous puff there.
Just to be clear, I’ve got another example of how the puff is created by the distance between the quilting lines.
So many times at show I will see glorious, but over done quilting. In my opinion, the flattening of the quilt diminishes its beauty.
You have the power to manipulate the puff in your favor. If you want to highlight something, you can flatten the background around the motif to make it more prominent. If you want to create puff, find that perfect distance between quilting lines that highlights the billow of the batting.
Keep on puffin’.
I’ll be linking up with Nina-Marie’s Off the Wall Friday!
Too funny, Jenny. I love your story and analogy. And of course, as usual, your work is stunning.
Thank you Schatzi-you have to have fun with this! Can’t wait to see what you are working on.
I have not mastered the art of the puff yet! Love all your examples here, especially the difference between close quilting lines and super close quilting lines. Very interesting! And, um, what an interesting experience at Empty Spools? :)
Debby it was a fun time at Empty Spools and we had many good laughs over it. Thank you for your comment!
I agree totally. What are you using for batting? I like a combo. 1 layer of cotton (or 80/20) and 1 layer of poly. The cotton shrinks and then the poly fills in and makes a bigger puff. I wish Hobbs would make a product with the 2 layers made into 1 (maybe even make it fusible) sure would be a time saver ;)
I use wool. Sometimes I have double batted as you do except wool and 80/20. Now that sounds like an interesting combo though, giving more puff. I’ll have to try that. Thank you for the note and idea Christina. I have some batting made by Matilda’s Own, and Australian company that I paid a fortune to ship here-it’s old, maybe 10 yrs old. I believe it’s a combo of wool and cotton. I just looked and I don’t think they make it anymore.
I love this article! How funny to juxtapose the two puffy groups! And you are lucky to have studied with Diane. I have her book and she has helped me on one occasion when the puff got away from me on a certain quilt.
Yes, who knew there were 2 puffy groups?! Oh I know I was lucky to study with her-twice actually. See you soon in Houston!!
Thank you for pointing out why many of the heavily quilted pieces I see at shows bother me. They need more air. Less can indeed be more.
Joanna that is how I feel but I hope I didn’t sound like I think that’s how it should be for all. I do like the puff and I do like a little air. I know many will look at my work and think I’ve over quilted it! I quilt to please my eye and heart.
Great post packed with total #CreativeGoodness. Absolutely inspirational.
I’m trying to remember if the class with Diane @ Asilomar, which you took, was also known as the “Chanter’s” class? I think we were in the same class (and I forgot?)
QuiltShopGal
http://www.quiltshopgal.com
Hmm, I don’t recall being the “Chanter’s Class”. It was in the spring of maybe 2005 or so? But my memory is not that great:-/ It was a Quilt Life altering class-I still stay in touch. Thank you for your comment!
Very interesting post Jenny – great food for thought :-) Love how you led into the discussion about quilting puff!
You’re welcome Raewyn-that’s how it really happened and it really was a giggle!
Thanks for the very helpful explanation. I suspect I am one of those who quilts so closely and flattens too much. I am so jealous of your 5 days with the Empress of FMQ.
Do you have any suggestions on how to keep the puff of feathers from getting those little wrinkles in each petal/frond/whatever you call them? I like feather spines that are wavy and curly and that seems to cause more of the annoying wrinkles. Thanks again for your very clear explanation and photos!
Very nice post! The pictures and the explanation were very good and I will definitely try out some of your ideas. Micro quilting sounds daunting though…I know I need to practice a lot more.
Thanks Jenny, for taking the time to write this helpful post!
You’re welcome Debbie-glad you enjoyed it. The thing about micro stippling is that it’s actually very forgiving! It’s so dog gone small who can tell if you did it well? Don’t let it intimidate you-if you have magnification it will be easy. Word of caution-DON’T look at your hands under magnification-they will look 50 years older and you will be aghast, giggle.
Love the post, Jenny! Your pictures speak louder than words; they really demonstrate puff vs. flat.
A whole lot of puffing goes on in my state, where marijuana is legal, and there are many grow operations in my area (operations that were, and many still are, illegal). I personally prefer the kind of puff that is the main subject of your post. LOL!
I am also a jealous reader; I have never had the opportunity to take a class from Diane! What a treat that would be!
Thank you Laura. I have taken 2 long classes with Diane and it changed my quilting life. She is low key and full of ideas, suggestions and true encouragement. She is my Quilting Hero and I am blessed to have taken her twice. She will answer your email years after having taken her class-and she remembers you!
It is so easy to get “caught up” in the stitching and over-do it. Not really a major issue on a wall hanging or table topper but a bed/lap quilt becomes stiff/board-like and unpleasant (and lacking in the cozy warmth-producing quality!)! Diane Gaudynski has truly mastered the texture/’puff’ factor!!! I so often refer to her 2 publications. Taking a class from her would be awesome!!!!! She really isn’t that far away from me but her life has changed the number of events she teaches. Sadness………………………
And I get caught up in overstitching! Diane is a dream to learn from. I don’t think she teaches any more at all. She has very serious allergies and cannot be in situations where something might threaten her health. I miss being able to take her classes.
Your post came at just the right time. I’ve been thinking a little trapunto was in order for my current piece. To counter balance the trapunto in the background I am plotting areas of more open FMQ with micro stippling. Just to prove the serendipity is alive and well, the comments to your post covered something else I was thinking of – combining poly and cotton batts.
Oh how funny-glad it was useful Gwyned! Serendipity…or great minds think alike?
What a wonderful post, humorous and helpful all at the same time. It makes me want to rush right to my machine and do some puff quilting.
I ‘m glad you enjoyed it Norma. Now go puff!
Great article Jenny. You made clear what I often struggle with: Less can be more! Thanks for the clarity on this issue. I’ll keep it in mind and do some experiments when I get my studio back.
Hah-like I understand less is more? I try. Thanks for the comment Franki!
Five and a half DAYS learning with Diane Gaudynski?!! I am so envious right now that I could be mistaken for the Jolly Green Giant (except for not being a giant, and not being very jolly, either). LUCKY YOU!!! That would be a dream class for me. Thanks for sharing. Your micro-stippling around the feathers is magnificent. I would like to learn more about that LED magnifier — is it something you attach to your machine, or is it a table lamp with a long neck, or something you wear on your head, or what?
Oh it was a dream class-I took her at Asilomar/Empty Spools as well as 3 days in Paducah at the museum. I get the LED from office supply and they usually do not have a brand on them. If you google LED magnifying lamp you will see some. Here is a link to get you started: http://www.globalindustrial.com/p/office-school-supply/accessories-furnishings/desk-lamps/5-diopter-led-magnifying-lamp-with-covered-metal-arm-black-277493?infoParam.campaignId=T9F&gclid=CjwKEAjw4s2wBRDSnr2jwZenlkgSJABvFcwQu-8pizlJfa1dC_p4cGpWlr6sKBU0f0CvTv2m6VzBbhoC1u_w_wcB Wow, long link!